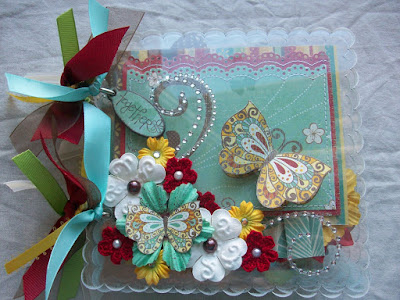
I found this poor album at M's awhile back, the packaging was tattered but the album was in perfect condition! Oh, and did I mention the best part??? It was on clearance for like 7 bucks...can't beat that deal! I bought some K&Co Wild Saffron paper that day too, so I guess they were meant to be together :-) The pictures I have posted don't really go so much with what I am actually saying..LOL I didn't take pictures as I went. They are just for your viewing pleasure as you read ;-)
Okay, back on track! This is deffinetly one of those bold, large print paper packs, but I made some cards with it last week too. It sat for a long time, this album was probably on the corner of my desk for a week! Waiting for the front page to come to me.
Finally, I saw a scrap with the butterfly tilted in just the right direction and remembering I still had the other sheet of the paper, knew I could cut out the other matching butterfly and place it directly over the top of it for the very front page of the album. After the front was stacked and ready to go I started with the back page, made it with one of the largest sized mats I would use.
I love to use double sided papers on acrylic, then you can use it for the mat on the back side of the page too. Cutting out each pages mat, I made my way back to the front. One tip, leave that protective sheet on the album til you absolutely HAVE to take it off! I glue right to it with my Zig glue pen, I just give the glue a moment to dry a little so it is only a temporary bond. After I had all the mats finished i sat down at the sewing machine and stitched around each mat. The temporary glue allows you to pull off the mat, sew it, and stick it right back on! Too easy...
Next, I find homes for lots of pretty flowers, taking care to see what will hide the backs of each of them. Sometimes the edge of a mat works, sometimes it's just another flower. When you have a good idea of what will go where on your page, pull the mat back off ONE MORE TIME, and peal off that protective sheet. With very clean hands design your page, my favorite permanent adhesive these days are those wonderful little glue dots!
After each page was all put together, I pushed the edges of the pages into my white Stazon ink pad, just enough to accentuate the scalloped edge. they can really get lost IMO without a little definition! :-)
Now I just bind it together with some book rings, tie on my coordinating ribbons, and finally my album is complete!
Before I go, is it just me or is anyone else finding it hard to find nice pretty paper collection and kits? I seem to be having a lot of trouble finding anything that trips my trigger! So many bold, large patterns... I have been thinking of going back to some previous lines for a bit. Who knows! If you have any suggestions, feel free to introduce me to them :-)


3 comments:
wow this mini album is one of the best i have seen so beautiful and well thought through you are a true inspiration. I only wish i could afford it as i would snap it up right away. good luck with it on ebay who ever gets this will be super lucky
This is beautiful Brandy! high bids!
So gorgeous! You do amazing work Brandy!
Post a Comment